Wednesday, August 14, 2013

New Product Blog Hop - Designed Decor Colonial White Frame Featuring Huntington and Cricut Artbooking

There is so much new product to love in Close To My Heart's Fall/Winter 2013 Idea Book that I had a hard time picking just one project to focus on. And, that new Cricut Artbooking cartridge is simply to die for! I can't wait for you to play with it.

I know the other consultants participating in this blog hop feel the same way, so make sure you complete the circle and visit all 32 blogs! Thanks for hopping over from Wendy's blog.

I decided to use the new Designed Decor Colonial White Frame, the Huntington Paper Pack and the CTMH Artbooking Cricut Cartridge to create this piece of home decor:


Here's the list of supplies I used (all NEW) product from CTMH:
Designed Decor Colonial White Frame, Z1865, $26.95
Huntington Paper Packet, X7174B, $9.95
Huntington Assortment, Z1881, $5.95
Bronze Shimmer Trim, Z1849, $4.95
Jute Ribbon, Z1867, $7.95
Mini-Medley Accents Rosewood Collection, Z1857, $5.95
Mini Clothes Pins, Z1815, $3.95
Cricut Artbooking Collection, Z1906, $99

Here are the cuts I used from Artbooking:
1) To cut the mat underneath JONES, I set my Cricut to Real Dial Size, selected Photo Mat 2 and chose to cut at 3". 
2) JONES and the Colonial White shadow were also cut using the Real Dial Size, I pressed Shift and cut each letter in capitals at 1 1/2". 
3) The pinecones were cut using the flower pattern, rolled up then shaken out to be loose. I cut them at Real Dial, selected Icon, pressed and cut them at 4" and 3". Thanks Laura Petruso for telling me my wonky flowers looked like pinecones!
4) To create the honeycomb overlay, I turned OFF the Real Dial Size, selected Overlay, pressed <4> and cut it at 8". 
5) For the overlay on top of the photo of my husband and I, I turned the Real Dial Size OFF, pressed Photo Mat 1, Shift and cut at 11" using the button.
6) For the mat under my boys' photo, I turned the Real Dial Size ON, selected Photo Mat 2, and cut at 5".

Continue the hop by visiting Helen's blog next! She always shares the best tutorials so make sure you read to the bottom!

Wednesday, July 31, 2013

August 2013 SOTM Blog Hop - A Chocolate Affair

Thanks from visiting from the super talented Helen's blog!

Who doesn't love chocolate?  There may be a few out there, but no one loves it more than one of my BFFs, Jenny. She eats it after every meal and stays thin by lots of activity and portion control.  I haven't mastered either of those, but I do share her love for chocolate!

Here's a peek at the super cute Stamp of the Month for August, A Chocolate Affair:


Jenny blessed me with her two oldest kids this week.  They came to "Auntie Shell" camp for three days and we had a blast at a local farm today, are headed to the Turkey Hill Experience tomorrow and the free movies in my town the next day.  My kids are in heaven playing with their best friends and I'm enjoying the sounds of giggles and outdoor fun that I'm not directing.  Anyhow, I think I'll send this card to Jenny when her kids go home...it only seems appropriate!


I combined a few of the sentiments for the inside of the card and masked the sentiment on the front of the card to just include the top portion of the "DEATH BY CHOCOLATE" sentiment.  The Babycakes Paper Pack (X7173B) worked great with the Chocolate colors as did the Babycakes Assortment (Z1869).  I added a little of the Prisma Glitter (Z134) to the top of the chocolate cake for some added bling!

I hope you enjoyed my card.  Now, head over to Sheila's blog to see more creative uses of A Chocolate Affair!

Friday, July 19, 2013

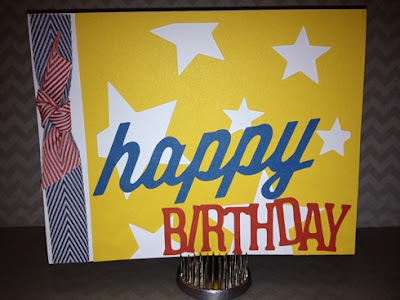
Artbooking - Star Happy Birthday Card

The new Artbooking cartridge from Close To My Heart is going to be my new go-to Cricut cartridge this fall.  I can't wait to try some of the amazing layouts they have ALREADY PROGRAMMED in for me (yes, they did is just for moi).

With major renovations going on in my house, it's been hard to find time for crafting.  But, with my dad's birthday a week in the past and a visit coming this weekend, I grabbed my Artbooking cartridge and spent five minutes (that's it, promise) cutting out a few things from the "happy" key to create this cute and simple card:


Scraps and a little Chevron ribbon (it comes in Cranberry now, too!), voila!  Card complete!

Sunday, June 30, 2013

Sweet Life - July Stamp of the Month Blog Hop

Thanks for coming over from Wendy's blog.

Sweet Life features three beautiful fruit images and six scripted verses.  It can be yours this month for just $5 with a qualifying purchase of $50 or more.


I gave my "secret sister" a bracelet for Convention and wanted a pretty bag to put it in.  I stamped the apple on one of the CTMH Muslin Drawstring Bags using Chocolate Pigment Ink. Then, using the Ruby and Sweet Leaf alcohol-based markers, I added a bit of color to the apple and leaves.  Finally, I used my fingertip to dab a little pigment ink, in Ruby and Olive, to fill the color.


Now, take a look at what Michelle Johns has to show you.

Friday, May 31, 2013

June Stamp of the Month Blog Hop - A Flowering Bunch

Welcome to the June Stamp of the Month Blog Hop featuring A Flowering Bunch.  Thanks for coming over from Judy's blog.

This stamp set features ten images that look hand sketched and are just begging for some CTMH alcohol based markers for color.


Here's my take on the set, using the My Creations Kraft Container, Z1833.


Have you ever pictured something in your head that seems so awesome, spent a lot of time on it then had totally different results than expected?  Yeah, me neither.

Now, head over to the lovely Krista's blog to see how she's used A Flowering Bunch!

Thursday, May 2, 2013

Happy 40th Birthday Card

Yesterday, my dear sweet husband turned 40.  While he sees himself as getting older, I only see all that he's accomplished over the last decade.  The sexy salt and pepper in his hair just reminds me of all the fun we've had as a family and how hard he works to provide a beautiful life for us.

I made this simple card for him to celebrate his special day:


I used the gray cardstock from the new Dream Pop paper pack.  The chevron pattern has a gloss resist; so, using a sponge and White Daisy pigment ink, I was able to really make the pattern pop.  The two stamp sets I used were: Perfect Fit - Frames 2 (D1536) and Perfect Fit - Birthday (B1417).

Happy 40th baby!


Wednesday, May 1, 2013

Later Sk8r

If you have a son (or a couple of them), you HAVE to do this workshop with me!  This Later Sk8r paper packet rocks and it was so fun putting these three layouts together.  And, they're great for beginners because we'll use the My Stickease (cardstock thick stickers) and all adhesive backed embellishments.


Join me May 15th or 21st from either 9am-noon or 7-10 pm for this workshop.  The $29 fee includes: a full Later Sk8r Paper Packet, Later Sk8r My Stickease, Later Sk8r Assortment, Blue and Green Epoxy Bubbles, two flip flaps and additional cardstock necessary to complete the layouts.  RSVP by May 2nd for the 15th or May 8th for the 21st.
 
Don't forget to add on the Dream Pop paper packet for just $10 when your order totals $35 or more (not including shipping and taxes, so you need to add $10 to the Later Sk8r workshop)!