Monday, December 31, 2012

Happy Valentines - January's SOTM Blog Hop

The glow from my Christmas tree is lighting my computer as I write this and I've got food in the oven for tonight's New Years' Eve party...but with crafting, it's always time to look ahead, so let's talk Valentine's Day!

Thanks for hopping over from Inky Georgia's blog!  Happy Valentines, Close To My Heart's January Stamp of the Month, is available only from January 1-31 and can be yours for just $5 with a $50 product order!


I have to admit I was a bit worried about working with this stamp set at first as I don't feel very confident in my "coloring" abilities.  But, the roses really grew on me as I used CTMH's new alcohol markers to add color.  I love the mini pigment inks to stamp the image before adding color with the alcohol markers.  Here's what I created:


My adorable husband sent me on a "treasure" hunt with clues that led me to one of those little families on the back of my minivan window (complete with a "scrapbooking" mom...and yes, that's hard to show on a mini-figure).  So, I thought I'd do the same for him by placing a clue (and a few chocolates) inside this cracker.
 

I made this card with "Smitten" sentiment to complement the cracker.

 
I hope you have fun making something with this stamp set for your Valentine!  Now, head on over and check out what Lori Brown has created for you!

Wednesday, December 12, 2012

Whooo's Your Valentine

This is just the cutest promotion CTMH has had in a while!  When you place an order for $35 or more from the Fall/Winter 2012 Idea Book, you can get this $40 kit for just $10.  What's included? 
You’ll receive 12 die-cut boxes, 3 cardstock sheets, 1 sheet of silver glitter paper, 12 treat tubes and an exclusive D-size stamp set created specifically for the kit:


While I didn't particpate in the blog hop for this set, you can check out some amazing artwork from the hop, starting with Melissa Laverty's adorable treat tubes and card.

Monday, December 10, 2012

How To Kiss...

with Stamps.  Yeah, yeah, misleading title, I know.  But once you have this little technique under you're belt, you'll be as excited about using it as kissing Santa!  Watch CTMH Power Duo, Monica and Kristine, explain this fun technique.


Check back in on Thursday when I'll share CTMH's latest Constant Campaign...Whooo's Your Valentine!

Sunday, December 2, 2012

Pear & Partridge Display Tray

Close To My Heart's Display Tray (Z1750) makes a fantastic Christmas gift when decorated simply with Pear & Partridge paper (X7162B), Dimensional Elements in Color - Holiday (Z1772) and the Festive Velvet Rub-Ons (Z1743).  The hardest part is deciding who I'm going to give this to!


Friday, November 30, 2012

December SOTM Blog Hop - Year Round Cheer

I'm so happy to share this month's Close To My Heart Stamp of the Month.  Thanks for coming from Sheila's blog. 


Year Round Cheer is such a versatile little set!  I decided to go for Clean and Simple cards nestled in a Cricut Artiste bag to give as a New Years' hostess gift!

Paper bag made with La Belle Vie paper and Black Tulle ribbon.

January, February and March cards.

April, May and June cards.
 
July, August (my favorite!) and September cards.
 
October, November and December cards.

Now, go check out what Angel created with this fantastic stamp set! 

Don't forget to visit the While Supplies Last section of my website when you order this stamp set.  CTMH has added new items and has further discounted ones already there!

While Supplies Last

Close To My Heart is adding a bunch of items to the While Supplies Last section of my website starting tomorrow, December 1st.  Make sure you check out what they've added.  ANNNDDDD...supposedly, they are going to even further discount the items already there.  So, get online Saturday morning and view all of the goodies available.  Remember, there's a reason they're called "While Supplies Last!"

Happy Shopping!

Wednesday, November 28, 2012

Christmas Gift Tags

Are you as obsessed with Pinterest as I am?  Well, I borrowed some fabulous ideas from some great artists (including the talented Lisa Stenz) on Pinterest.  Here are some gift tags I plan on selling this weekend at a craft show, as well as attaching to my gifts!

I used my Cricut Art Philosophy cartridge quite a bit.  If you don't have it yet, you need to add it to your Christmas list!


This simple little candy cane came from a retired set, Share the Magic (D1443).  I used Cranberry Twine and a Black eyelet to add a little something to this simple gift tag.

 
This tag came straight from Lisa Stenz (see link above), using the Merry Christmas stamp from Holiday Cheer (B1381) and the holly from one of my favorite sets, A Holiday (A1115).  Just a bit of Red Glitz for the holly and some white hemp finished this tag off.
 
 
I love Kraft paper for holiday wrapping and tags.  Pear & Partridge paper (same piece, just front and back of a B&T) and Cranberry cardstock created the trees and star flowers.  I popped them all up to give some dimension to the gift tag.  Chocolate Twine and a bitty sparkle added just the right touch.


I love this sentiment from Christmas Joy (C1520) stamped in Cranberry Ink.  The tag is on New England Ivy and Cranberry grosgrain ribbon and some sparkles complement the simplicity of this tag.


Now, just to do the shopping so I'll have something to put these tags on!

Monday, November 26, 2012

Pear & Partridge Star and Cyber Monday Deal

"It's the most wonderful time of the year!"  I can't stop singing this favorite Christmas song, because I'm thrilled for the approaching Christmas season.

Creating Christmas decorations and crafts just puts me in a generous and jovial mood.  This weekend, I made a few of these decorative stars for a show I'm doing on December 1st.  They're so simple and quick to complete.


Here's what you need:
  • My Creations Star (Z1803)
  • Pear & Partridge Paper Pack (X7162B...or use leftover paper from the WOTG!)
  • Sparkles Flourishes (Z1708)
  • I also used my favorite adhesives: Bonding Memories Glue (1512) and Liquid Glass (Z679)
If you want perfectly fitted paper, Close To My Heart has directions and a printable for the star on their website.  Because the star is 3-D, I found that the sparkles flourishes need a little help staying flat on the star so I added a bit of liquid glass underneath to keep them beautifully in place.

In honor of today being Cyber Monday, I'm offering FREE shipping to anyone who places an order on my website and joins my Nifty November party today through November 30th!  Visit my website HERE, scroll down and click on Join next to Nifty November.  You'll pay shipping on-line and then I'll send you a check reimbursing you for your shipping the same day!

Wednesday, November 14, 2012

Pear & Partridge Cards

Here I am in sunny Riviera Maya, Mexico at the gorgeous Excellence Resort and what am I doing? I'm making my Pear & Partridge Christmas cards, naturally! After a few days of sun, fun in the ocean/pool (and more than one cocktail!) I was itching to get my craft on. I'm listening to my iPod, sipping champagne and distressing cards...and loving every minute of it.

When I get back next week, I'd love to chat with you about how you're getting your cards finished! Until then, I'll be scrapping and sipping in the sun! Adios, amigas!

Thursday, November 8, 2012

Thanks Banner

The Halloween decorations are down and the Thanksgiving decorations are up.  Yesterday was my last after school class for the session and the kids and I made these Thanksgiving banners.


The worst/best part of the class was that I only cut two-of the four-papers I needed for the kids to make the fans under the turkeys.  One of the girls (thanks Ali!) suggested using one fan-so, a semi circle-on each turkey to create "feathers".  I love how creative this group was!

Along with decorations and cooler temperatures came a nasty cold.  Sorry for the short post, but I did want to share this sweet and simple little banner.

Wednesday, October 31, 2012

November SOTM

Thanks for coming from the talented Amy's McVey's blog, Clearly Stamping.

Welcome to November's Stamp of the Month Blog Hop!  This month, over 60 consultants will be featuring artwork using the stamp set, Capture the Date.  You can get this practical stamp set (with 72 images!) for only $5 with your order of $50 or more.  AND, to sweeten the deal even more, when you qualify for and purchase Capture the Date, you'll get another stamp set (of your choice) for 50% off!  This includes all of our A-E sized stamp sets!  Visit my website to start shopping now (well, after you finish the blog hop!).


Using Make It from Your Heart, Volume 1, Pattern 25, I created this Christmas card:


I used first and second generation stamping to stamp december as a background.  Then, it's hard to see, but I stamped the 25 first in Cocoa Ink (Z2114) then, I embossed it in clear.  The paper is all from Pear & Partridge (X7162B), the ribbon is from Cocoa Collection (Z1316), the pearls are from the Mocha Opaques Adhesive Gems (Z1333).  Inside I stamped "Merry Christmas."

The wind is really gusting now (thanks to Sandy!) so I hope this post goes live as scheduled.  I wish you and your loved ones a safe and healthy Halloween!

Now, head on over to see what creative artwork DiAnn Denson has come up with at Di's Stamping Room.

Like my Facebook Page before midnight on Halloween to earn a chance to win a Hooligans Halloween mini album!

Sunday, October 28, 2012

Simply Stunning Silver Pendant

Loretta Stem, a very talented friend and artist, created this custom pendant just for lil' ole me.  I couldn't love it more!

 
Can you believe that she used a stamp to create the image?  In my pendant, she used an image from Cricut Artiste Collection Kudos (D1530) that came with the Cricut Artiste Cartridge.  Then, she found a font I loved to write "Scrappy Hour" in the middle.  Isn't this just gorgeous?!
 
To check out more of Loretta's work, visit her website, Simply Stunning Silver Jewelry.

Wednesday, October 24, 2012

Six Weeks of Halloween - Week Six, Moonlight Layouts

Halloween is just one week away and these layouts are ready for photos!  I love having a project done before the event.  These two layouts are straight from Close To My Heart's Moonlight Workshop on the Go Kit.  So detailed and gorgeous, but with easy-to-follow directions, they were a breeze to put together.


Look at the details on the BOO title.  Per CTMH directions, I used a Blending Pen to pick up just a bit of Smokey Plum Ink to add dimension to the mummy.  I used the same Blending Pen to add a little Goldrush Ink to the lantern above.  I'd totally forgotten about that technique!  Other favorites from this workshop: edge distressing the black bases and putting Bitty Sparkles in the skull eyes (from the Haunted Assortment).
 
It's not too late to do your Halloween scrapbooking.  Order your Moonlight WOTG kit today!

Monday, October 22, 2012

Christmas Advent Calendar

There are just nine short weeks until Christmas Eve.  Nine week from TODAY.  I'm not saying that to stress anyone out, this is my favorite time of year.  I'm letting you know because this is the time to start working on your Christmas decorations and gifts.  And, I'd love to help you with them!

For starters, check out this beautiful Advent Calendar from Close To My Heart:


After Career Day at my sons' elementary school last week, I got emails, phone calls and facebook messages from moms whose children LOVED this Advent Calendar.  It's so easy to make! Everything is pre-cut for you; just stamp, embellish and assemble to complete your gorgeous Advent Calendar in about three hours.  I currently have workshops scheduled for November 2nd at 9 AM and November 7th at 7 PM.  Need another date?  Contact me today to check my availability!

And, if just one Advent Calendar isn't enough, add the one below for just $40 (includes shipping and tax).  This one is exclusive to my customers and can only be purchased through yours truly!


Still in the Halloween spirit?  That's okay, there are still nine days to like my facebook page to win this adorable mini Halloween album!

Wednesday, October 17, 2012

Six Weeks of Halloween, Week 5: Jane-o-lantern Plate

Thanks to Fancy Melissa for the inspiration for this decorative plate using Chalkboard Vinyl and the CTMH Cricut Artrist Cartridge!

I've been wanting an excuse to use my CTMH Chalkboard Vinyl ever since I bought it in August.  I tend to hoard products and just hadn't figured out the best way to use it.  After I found this bright orange charger at my local craft store and saw Melissa's awesome post a few weeks ago, I knew I'd found my excuse!


Why do pumpkins usually look masculine?  Living with three males (husband and two sons, just to clarify!), I wanted some girl power in the house.  While the pumpkin's face is gender neutral (I cut out the Chalkboard Vinyl with Artiste, Accent 2 Boo at 6 3/4 inches), adding a Black Tulle Ribbon bow and a paper flower (left over from the witch's hat I'd made last week) added a feminine touch.


Who says Halloween has to be scary?  I think this pumpkin is rather sweet!

It would be sweet if you'd head over to my facebook page and like it.  And, you can even when a fangtastic prize!

Monday, October 15, 2012

Seasons' Bounty Favors

Fall is such a beautiful, colorful time of year.  Here in Northern Virginia, the leaves are turning beautiful shades of yellow, orange, red and brown.  I made these fall favors for the teachers who will visit my "Career Day" presentation this Thursday at my sons' school.  I wanted to share the beauty of Fall with these caring professionals!

 
The sentiment reads, "May the bounty of the season fill your heart and your home" from Quick Cards-Bountiful Season Stamp Set (A1130). 
 
To create the favor "box," I inserted my Artiste Cartridge (Z1790) into my Cricut and used the Card feature, Thanksgiving button and cut it at 3 1/2 inches.  I was able to get three to each piece of Goldrush Cardstock (1243). I used Desert Sand Ink (Z2118), then used Sponge Daubers (Z726) to add Ruby (Z2170) and Olive (Z2137) Inks to the leaf and swirls.  When they open the favor, this is what they find inside:
 
 
Who doesn't love Tic Tacs?  I combined "Cherry Passion" and "Apple" Tic Tac packs to create this fun fall mix.  But, what about the kids?  Thanks to my pal and Let's Get Fancy teammate, Chrissy Curtis, for the moustache on a stick suggestion!
 
 
I made 180 of these little moustaches using my Cricut Artiste Cartridge, Accent 2, Shift at 1 inch.  Using Auto Fill, 30 moustaches were cut on each piece of Black Cardstock.  Both favors are cute and inexpensive crafts.
 
Wish me luck on Thursday!  I'll try to post a photo of the event on my blog on Friday.  And, enjoy the beauty and bounty of Fall! 


Friday, October 12, 2012

Save with Studio J

Are you in photo overload?  Do you need to RESCUE your pictures?  Then you, my friend, need Studio J!  Studio J is Close To My Heart's answer to digital scrapbooking.  And, not only did they answer they got an A+ on this one! 

This month ONLY, they're giving you a free layout when you buy 9!  Or, you'll get two free layouts when you buy 18, three when you buy 27, you get it.

I love Studio J to catch up on my scrapbooking.  Life is busy, and I will NEVER give up my traditional scrapbooking, but sometimes I just need to get pages done quickly.  And, my Studio J pages are beautiful!

Try it out yourself for free today.  Visit my website to play with Studio J.  I also offer free one-on-one tutorials on making the most out of your Studio J experience.  You're going to love it!

Wednesday, October 10, 2012

Six Weeks of Halloween, Week Four: Witch's Hat

What screams (or howls, cackles or growls) Halloween like a WITCH'S HAT?  To create this trendy hat this witch wouldn't mind wearing, I covered a premade craft paper witch's hat with Close To My Heart's Moonlight paper, added some Tulle Ribbon and a sparkly Cricut Art Philosophy flower.


I used the black and purple B&T Duo from the Moonlight Paper Packet (X7161B) and cut it into a circle using the Art Philosophy Cartridge (Z1686), at 10 1/4 inches.  I then cut out the interior of the circle by centering my Cricut blade over the middle of the circle and cut again at 4 3/4 inches.  Voila!  I had the perfect bottom of my witch's hat, which I adhered using Bonding Memories Glue (1512).  Then, I took another piece of the same paper and trimmed and swirled it around the cone of the hat.  There was a little bit of a gap between the two pieces, but that's what Tulle Ribbon is for!

Here's the messy part that I still haven't quite figured out.  The Black Tulle Ribbon (Z1798) kept slipping up the cone of the hat.  I tried Liquid Glass, Glue Dots and finally settled on hot glue to keep the tulle in place.  However, I held it too tightly while it dried in a few places, leaving a messy white glue mark (but it's in the back so you'd never know if I hadn't told you!).

Finally, I used the CAP Cartridge again to cut out that fabulous flower.  I think my all time favorite piece of paper is that black and white stripe from the Moonlight Paper Packet!  I used the Font key and cut out at 7 inches.  Then, I used another new favorite, the Quilling Tool (Z1795).  If you don't have one of these, they're a must! That flower took seconds to create!  A spray of adhesive (I used 3M) and then a sprinkle of Prisma Glitter (Z134) blinged it out!  A little Liquid Glass (Z679) held it perfectly in place.

If you like this project, join me next Wednesday for another Halloween creation!  And, I'd love to have you like my page on facebook. Everyone who likes my Scrappy Hour page before October 31st will be entered into a drawing for this Halloween mini album!

Monday, October 8, 2012

Avonlea Thanks

One of my closest friends (and biggest supporter!), Jorie, asked me to make thank you cards for her.  Here's what I came up with:


They are sweet and simple.  I love the on-trend colors of Avonlea and know she will, too.

List of supplies used:
Colonial White Value Pack Cards (X1410)
Avonlea Bulk Paper (BULK255 for Consultants)
Chocolate Cardstock (X5643)
Colonial White Cardstock (1388)
Cricut Artiste, for shapes, (Z1790)
Chocolate Exclusive Inks Stamp Pad (Z2111)
Bulk Chocolate Grosgrain Ribbon (retired)

Happy Columbus Day, everyone!

Wednesday, October 3, 2012

Six Weeks of Halloween - Week Three

Just 28 more days until Halloween (so say my Halloween Countdown Blocks), and today is the first day of my after school program, Halloween Scrapbooking.

I'm excited to teach nine elementary students (I have two boys in my class this time, hooray!) how to cut, stamp and embellish their way into the art of scrapbooking.  And, with this sweet little Halloween Mini Album, they'll enjoy their work for years to come.


I used Close To My Heart's Quick Pic Album (Z1407) for perfect 6x6 layouts.  I also used some retired products that I gobbled up last year from the Hooligans paper pack.  Each student will get a Hooligans Level 1 Scrapbooking Kit that includes four preprinted pages, two B&T Duos, two Cardstock Sheets and two My Stickease Adhesive Sheets.  They'll also get the My Stickease Hooligans Assortment, Boutiques Monster Mash (those adorable felt monsters with googly eyes) and a package of Mini-Medley in Pear.  Check out their stash below:


I can't wait to see what they come up with!  And, I can't wait to see what YOU come up with, either.  I have four of these kits (album in olive green or pansy purple, the paper, stickease, and all the embellishments) available for just $30!!!  Leave me a comment or email me here if you're interested!
 
Want one of these albums for yourself?  Like my facebook page and on October 31st I'll pick one lucky winner to receive a completed Halloween Mini-Album, sent to them FREE!  Head over to my facebook page and Like it now!

Sunday, September 30, 2012

October Stamp of the Month Blog Hop - Very Merry Christmas

I know, it's only October and we're already talking about Christmas.  What are we, a department store?  Well, if you like to make homemade cards, crafts and gifts for Christmas, now IS the time to start.  And what better way to get inspiration than from completing the CTMH SOTM blog hop?!

Thanks for visiting from the talented Susan Brooks' blog.  Close To My Heart is offering Very Merry Christmas, a little gem of a stamp set for October's Stamp of the Month.  I love the sentiments and how the classic images work perfectly with the Artiste Cricut cartridge.  With a qualifying order of $50 or more, you can get this stamp set for just $5!
 
 
Very Merry Christmas inspired me to make two sweet, but simple, Christmas cards.  My first card has rounded corners and Color-Ready Seam Binding Ribbon (Z1732) that I dyed Cocoa, with a few Bitty Sparkles (Z1263) to brighten it up.  I cut out the shapes using my Cricut Artiste cartridge.  The Cashmere cardstock was cut at 3 inches (3D Object, Shift, <%>).  The green B&T paper was cut using the same buttons and functions, but at 3 1/2 inches.  Did you know that the latest My Acrylix Stamp Sets include the CTMH Cricut cartridge the images coordinate with, the size they should be cut at and the page number to find the image?  Love it!!!
 
 
I love adding a sentiment inside the card.  The set comes with "Wishing you a season filled with sweetness."  I only inked the "Wishing you" part of that sentiment in New England Ivy and then stamped "A Very Merry CHRISTMAS" below it in Cranberry ink.  I like how it turned out!
 

The next card I cut out with the Art Philosophy cartridge (Card at 4 inches) using New England Ivy cardstock.  I cut out the mittens with Artiste and then stamped them with cranberry.  To give them a "fuzzy" look, I immediately dabbed them with some flocking powder after I stamped each one.  I added some Sparkles (Z1752) to the center of the mittens and tied them together with some Cranberry Baker's Twine (Z1751).  I cut off the bottom of a 3 1/2 inch circle to stamp the sentiment, Warmest Wishes in New England Ivy.  I curved the stamp to follow the shape of the ornament.  For a video tutorial on how to do that, click here.
 
 
Inside the card, I cut out a 3 1/2 inch circle using Art Philosophy and stamped Christmas Cheer in the center.


I hope I've inspired you to start working on your Christmas cards.  Now, head on over to my good friend, Scrapi Traci,'s blog to see what fabulous creations she's come up with for you!

Wednesday, September 26, 2012

Six Weeks of Halloween - Week 2

Countdown to Halloween!

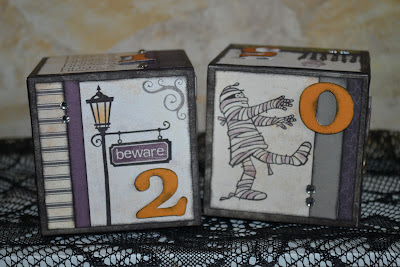
Do your kids ask, "How many days until...?"  Mine do, about ten times a day, no lie.  How many days until the weekend?  How many days until our cousin comes?  How many days until Chistmas, my birthday, ahhhhhhh!!!  It makes me crazy sometimes.  So, I've eliminated one of those questions (how many days until Halloween?) with these:


I love these cute little blocks that count down the days until Halloween!  Each side is covered in a few scraps leftover from the Moonlight Workshop on the Go, has spooktacular stamping, a few embellishments and a number (cut from CTMH Art Philosophy Cartridge on the Cricut and adhered to a Dimensional Element Number). 

If you're already doing the workshop, all you need to purchase are just two My Creations Blocks (Z1746) and the DE Numbers (Z1681).  Photos for each side of the blocks can be found on Close To My Heart's website under Ideas and Inspiration, Workshops on the Go, Moonlight Bonus Project or by clicking here.

Want a free tutorial on the four scrapbook pages on Moonlight?  I'm hosting the awesome Moonlight Workshop on October 9th at 7 p.m. and again on October 23rd at 9 a.m.  Let me know if you're interested!


Like my facebook page! https://www.facebook.com/#!/pages/Scrappy-Hour/119683301462528